puLse4D
Ambitioniertes Mitglied
- 77

Achtung! Beim Flashen dieser Rom, kann die Garantie erlischen! Achtung! BRICK Gefahr!
Keine Haftung!
Keine Haftung!
Rom Infos:
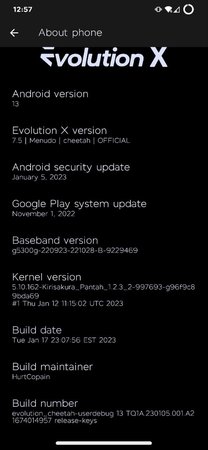
• Evolution X
• Android 13
• Android Security Update 05. Januar
• Android 13
• Android Security Update 05. Januar
Screenshots:
Bugs:
• Android Intelligence System
• BT Anruf im "Auto"
*ggf. behoben im 22.01.23 Update
• BT Anruf im "Auto"
*ggf. behoben im 22.01.23 Update
Telegram Gruppe:
• Link
Download Link:
• Download
• Download 22.01.2023 / OTA Online (langsam)
Flash Installation Deutsch Win:
Einmal hier die neuste Version herunterladen von SDK Platform Tools: Download
Falls nicht vorhanden hier die ADB Android Treiber: Download
Evolution X Rom: Download
Bitte sichert alle wichtigen dinge auf eurem Smartphone (Bilder, Videos, Dokumente...)
Seid euch bewusst, dass Gerät kann bricken und schaden nehmen. Weder der Rom Hersteller, Android Hilfe oder ich haften für Schäden an dem Gerät.
1.
Geht in die Einstellungen von eurem Smartphone. TelefonInfo > 7x auf Build Nummer drücken, falls noch kein Entwickler Modus aktiviert ist.
Zurück auf Einstellungen > System > EntwicklerModus und USB Debugging aktivieren so auch OEM unlock.
2.
Pixel 7 Pro an dem PC über das USB Kabel anschließen und auf diese Webseite gehen. Link
Das P7Pro verbinden und am Smartphone ADB für den PC zulassen.
Wichtig unter Public die letzte ROM wählen und folgendes unter erweitert auswählen: Verity deaktivieren und verfication.
Wipe an lassen.
Prozedur starten und durchlaufen lassen. Nach dem Start des P7Pro ADB wieder erlauben, bei der Aufforderung.
Gerät danach in den Fastboot Modus bringen. (Ausschalten, Vol Down + Power)
In dem Ordner von SDK Platform Tools kommt die Evo X Rom.
Im Ordner mit (Shift auf der Tastatur und rechte Maustaste) dann Terminal / CMD öffnen und folgednes eingeben:
fastboot set_active other
danach:
fastboot -w --disable-verity --disable-verification update EvolutionX_cheetah_beta.zip
Viel Spaß
Flash Installation English:
Official Evolution X builds for Cheetah and Panther BETA 1 - There are a few minor bugs but no deal breakers, read this whole post.
Thanks to @Stallix @anierin_bliss @RealAkito @ the whole team for an awesome rom
Thanks to @wrongway213 @xstefen @spezzi77 @delet_thiskthx @freak07 @JD1811 and my countless friends and testers. You dudes rock!
Please read this, bc if you ask a question that is answered here you will be referred to reading this.
Kirisakura_Pantah 1.2.3 is built in now. Thanks to @Freak07 for his kernel magic!
Installation Instructions:
Have latest Platform tools from Google (SDK Platform Tools release notes | Android Developers)
- NOT MINIMAL ADB/FASTBOOT (these are pretend and you should be ashamed of yourself xda for posting them)
Extract and if on windows, where you see the contents, clear the file explorer path, type cmd. Place zip in here. Enter commands from this window. On linux, download the zip, extract. Open root shell cp adb to /usr/bin/ and cp fastboot to /usr/bin/
Be on January STABLE firmware
*It is suggested that you first run the flash all script, skip setup, reboot to bootloader. then fastboot set_active other, run the flash all again, then follow the instructions from this step below. Or use the Google Flash tool. Be sure to tick force flash all partitions-this doesn't flash both, it only flashes ALL. Also, tick disable verity and verification, and wipe.
*be sure allow stock to boot up first. Skip setup, enable adb approve permission, reboot to bootloader, from here either connect the Google flash tool and flash the other slot by first sending the command fastboot set_active other. Now, begin the flash via the tool, or if manually flashing, ./flash-all.sh or flash-all.bat.
Once it boots up, skip setup again, enable adb, approve permission, reboot to recovery (when you get to the "no command" screen, briefly hold power, tap vol up to enter stock pixel recovery)
wipe data/factory reset
select reboot to bootloader
it reboots to bootloader
type the following:
fastboot -w --disable-verity --disable-verification update NameOfZip.zip *replace name of zip with the zip's name
from here do nothing. Allow it to flash and then boot up. Enjoy.
Kernel Notes:
Be sure to flash the appropriate powerhint modules after you get all booted up. We are using v4. Patch init_boot with magisk, flash patched init_boot, open magisk, flash powerhint module for cheetah or panther YOU CAN UPDATE THIS via FKM to newer versions.
Any flash errors at this point are on you and your platform-tools not being the latest or are that crappy minimal shit no one should EVER use.
Device Changes-
- Aperture aux cam config (both GoogleCamera or Aperture is included)
- trees based on statix, thank you @delet_thiskthx for the great work you continually do for the community
- re-allow installation of 32-bit applications(32 or 64 bit apps will install and work now)
Yes, you can install either 32 or 64 bit apps
Zuletzt bearbeitet:


 freue mich schon.


